


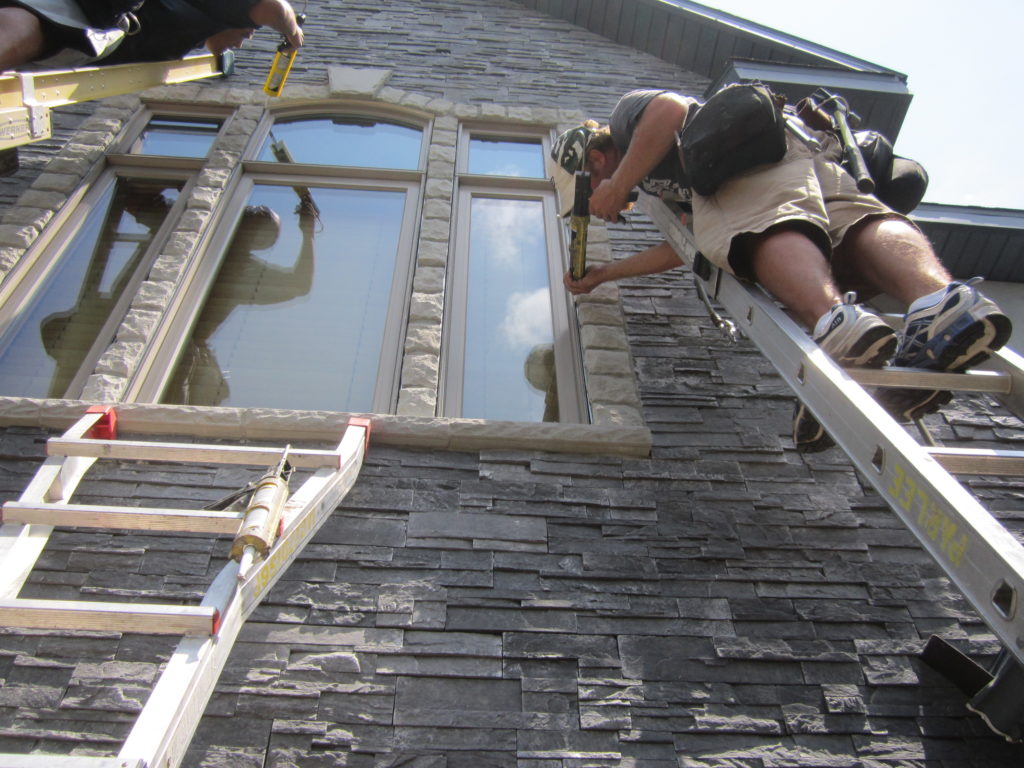
Most of my work is in exterior remediation, both as a builder specializing in exterior work and (more and more these days) as a building consultant inspecting and advising owners and builders when moisture problems arise. I see a lot of failures, and most of the hands-on work we do is fixing other builders’ mistakes. Daily I am reminded of the need for wider understanding of best practices, and that is especially true with adhered concrete masonry veneer (ACMV). We call this material “stone,” but we all know that it is a non-load-bearing concrete cladding made to look like pieces of stone set in mortar that is bonded to a stucco scratch coat. We really need to be treating this material like stucco with chunks of concrete in it. When we lose sight of that, problems arise.
ACMV has been increasing in popularity as a cladding on mid- range and high-end homes for the last decade, and across the Midwest where I work, a huge number of these homes are now showing signs of water-damage because the ACMV wasn’t installed correctly the first time. I am an Exterior Design Institute (EDI) third-party EIFS and building envelope inspector, and this work has recently led me to work with relocation service companies. When a person is relocated by a company to a home with an EIFS exterior, it has for a long time been an automatic trigger for an inspection, owing to all the acute moisture problems—often leading to severe mold problems—suffered by buildings with EIFS. Now, at one of the three national companies I do inspections for, ACMV on the exterior of a home has become an automatic trigger for inspection, too. I believe that the problems are worse with ACMV, and they will make the EIFS problems look like a drop in the bucket.
The best practices described in this article apply equally well to new construction, when they should always be used, as well as to remediation. But if you apply them in new construction, you won’t have to apply them as a repair.
I’ve written a number of articles for JLC about both ACMV and EIFS failures (search “Parlee” at jlconline.com). In this article, I’m going to focus on doing it right the first time. But the photos come from a remediation job. It cost $33,000 to repair the problems on this 14-year-old home. Adding a drainage membrane from the outset would have cost only about a buck-and-a-half per square foot installed. That’s pretty cheap insurance to keep the envelope dry and performing well, considering the alternatives.
Drainable System

If you get anything from this article, let it be this: ACMV must drain. This is true of any cladding system, but with ACMV it’s especially important because all those chunks of concrete hold a lot of water. If that water can’t drain, it’s more likely to get sucked into the framed wall than it is to evaporate to the outside. Brick veneer works the same way, except that most builders know (and code demands) that there is a minimum 1-inch air space behind the veneer (although a 2-inch gap is recommended by the Brick Institute of America). While there can still be problems with this detail (namely from mortar droppings and squeeze-out that fills the space and creates numerous bridges for water to wick to the framing) for the most part the assembly works to allow moisture to drain to the outside from behind the brick. To create a drainable system, I always use a rainscreen material, such as Keene Dri-wall (keenebuilding.com), which is shown in the photos for this job. Recently I have been using MTI Cavity Gravity (mtidry.com), which was developed for brick walls but also works with EIFS and ACMV. It stays rigid, which makes applying the lath easier and helps to maintain an even thickness for the scratch coat.
A rainscreen material makes the whole wall very forgiving, so you can get away with holes, thin spots in the scratch coat, and other mishaps in the assembly that are bound to occur no matter how diligent you are when inspecting the work. But what you can’t skimp on is providing a place for the water to drain at the bottom. In fact, if you provide drainage but don’t allow it to exit, you can accelerate the water damage because a build-up of water will concentrate at the base of the walls.
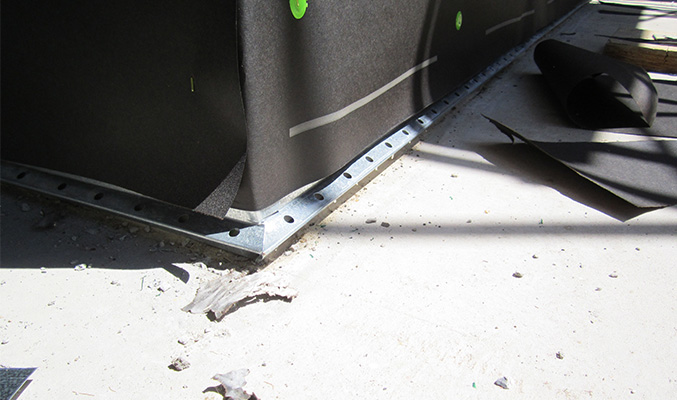
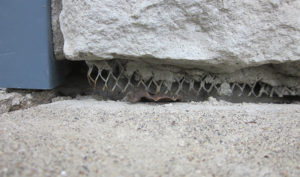
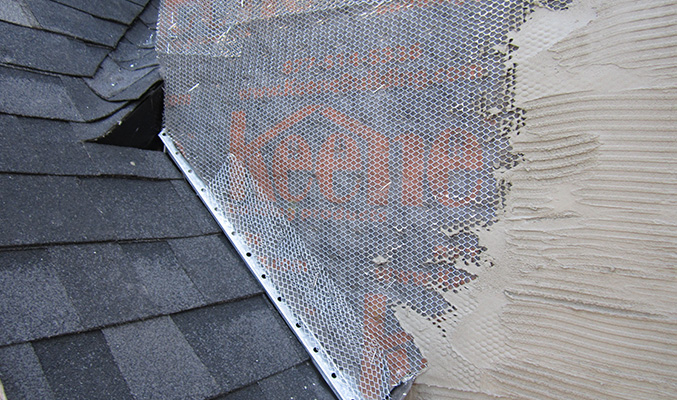
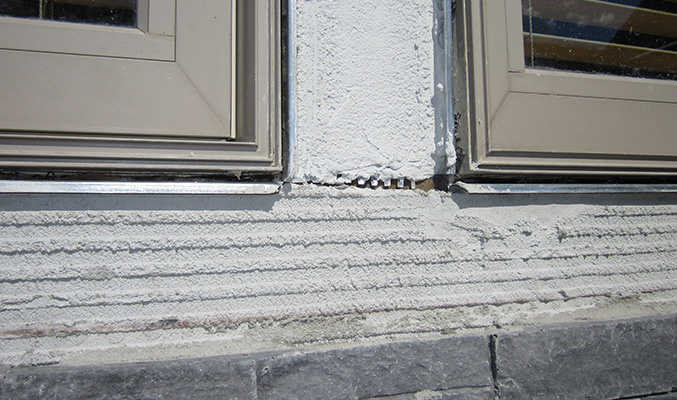
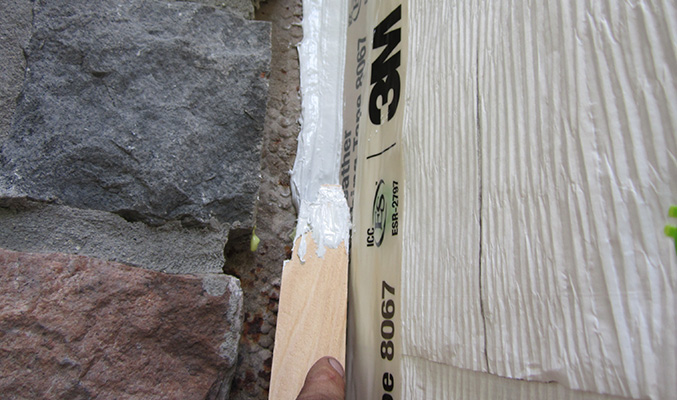
To ensure good drainage at the base of walls, we always apply a weep screed. This is the essential piece that will allow drain water to exit the cladding assembly. At the exterior steps on the house, we had to install aluminum flashing first to bridge over the sheathing transition (see image 1). This flashing extends down the wall into the drain- able subgrade beneath the steps and sidewalk. This gave us a clean surface against which to adhere the sealant after installing backer rod in the gap between the concrete steps and the flashing.
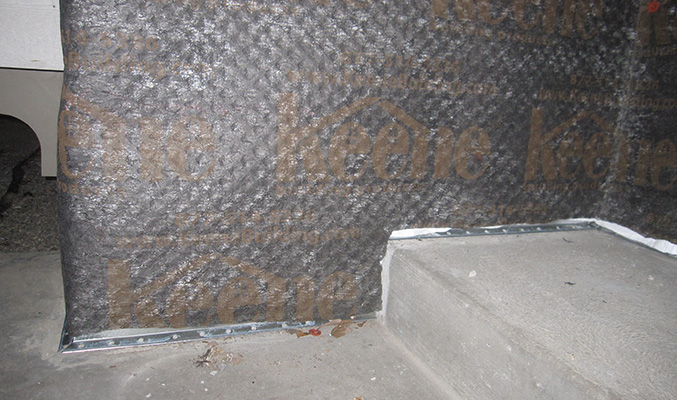
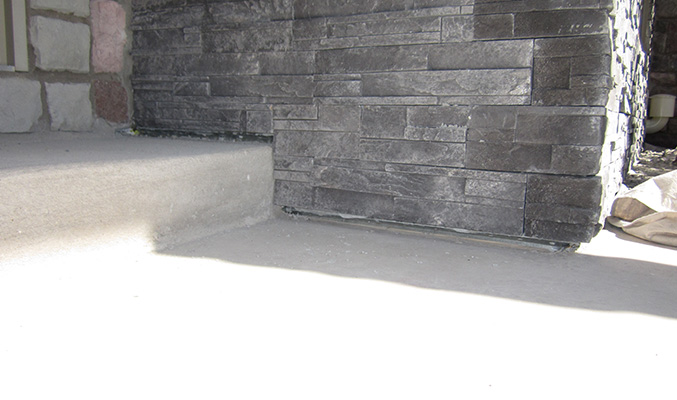
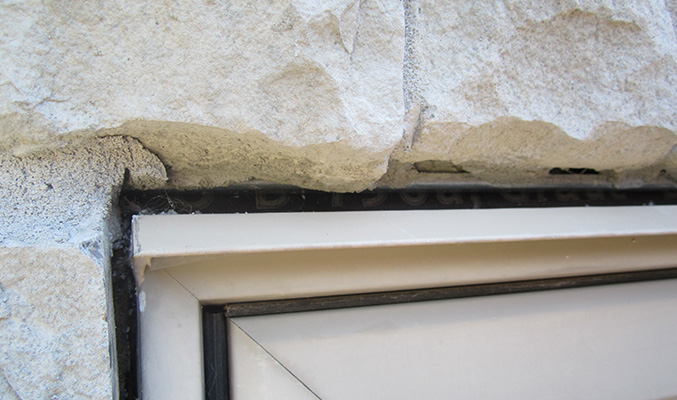
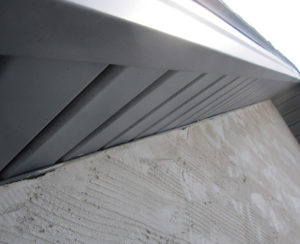
After installing the weep screed, we cover the walls with house- wrap and building paper (see image 2), and finally, install the rainscreen material (see image 3). Lath and the scratch coat will go over the rainscreen mat, followed by mortar and stone (see image 4).
I get a lot of flak from builders about specifying both housewrap and black paper, but it doesn’t cost that much more, especially if it prevents the high cost of a remediation. Without the rainscreen material, black paper would serve as an essential sacrificial layer over the housewrap, allowing water to drain between the two sheets. By itself, housewrap can form a capillary bond to mortar or when the two materials are pressed directly against each other. Either way, this can allow water to pass through the housewrap. With a rainscreen material, this is less of an issue, but I like hav- ing black paper to slow solar vapor drive. Because ACMV holds a lot of water, it is prone to evaporation toward the inside when the sun is beating down on a wet wall. Housewraps are made to be permeable to promote drying, but that means moisture vapor can pass through them from outside to inside. The black paper will not prevent solar vapor drive, but it will slow it down. If we can slow down the wetting time, we have a better chance of avoiding problems.
Stucco Basics
 In addition to always applying a weep screed, there are a few other basic rules for stucco that apply to ACMV.
Lath. Metal lath must be installed with the right side up, or the scratch coat will slide off the building. On wood framing, lath must be installed with the long dimension perpendicular to studs. At corners, make sure that the lath is not installed too tightly, or the scratch will pop off. Best practice calls for securing lath with furring nails, which place the lath roughly in the center of the scratch coat. But when securing lath over a rainscreen, staples work well, too. Just turn down the pressure so you don’t compress the mat too much.
Scratch coat. Clean sand is the key to creating a strong scratch coat. Dirty sand, or sand intentionally mixed with clay to improve workability, will become porous as the clay dissolves, leaving be- hind air pockets. The mix for a scratch coat should be rich (high cement content) so that it cures hard. Perform a “nail test” on cured scratch coat: If dragging a nail across the surface leaves a white line, it is hard enough to apply the mortar that adheres the stone cladding.
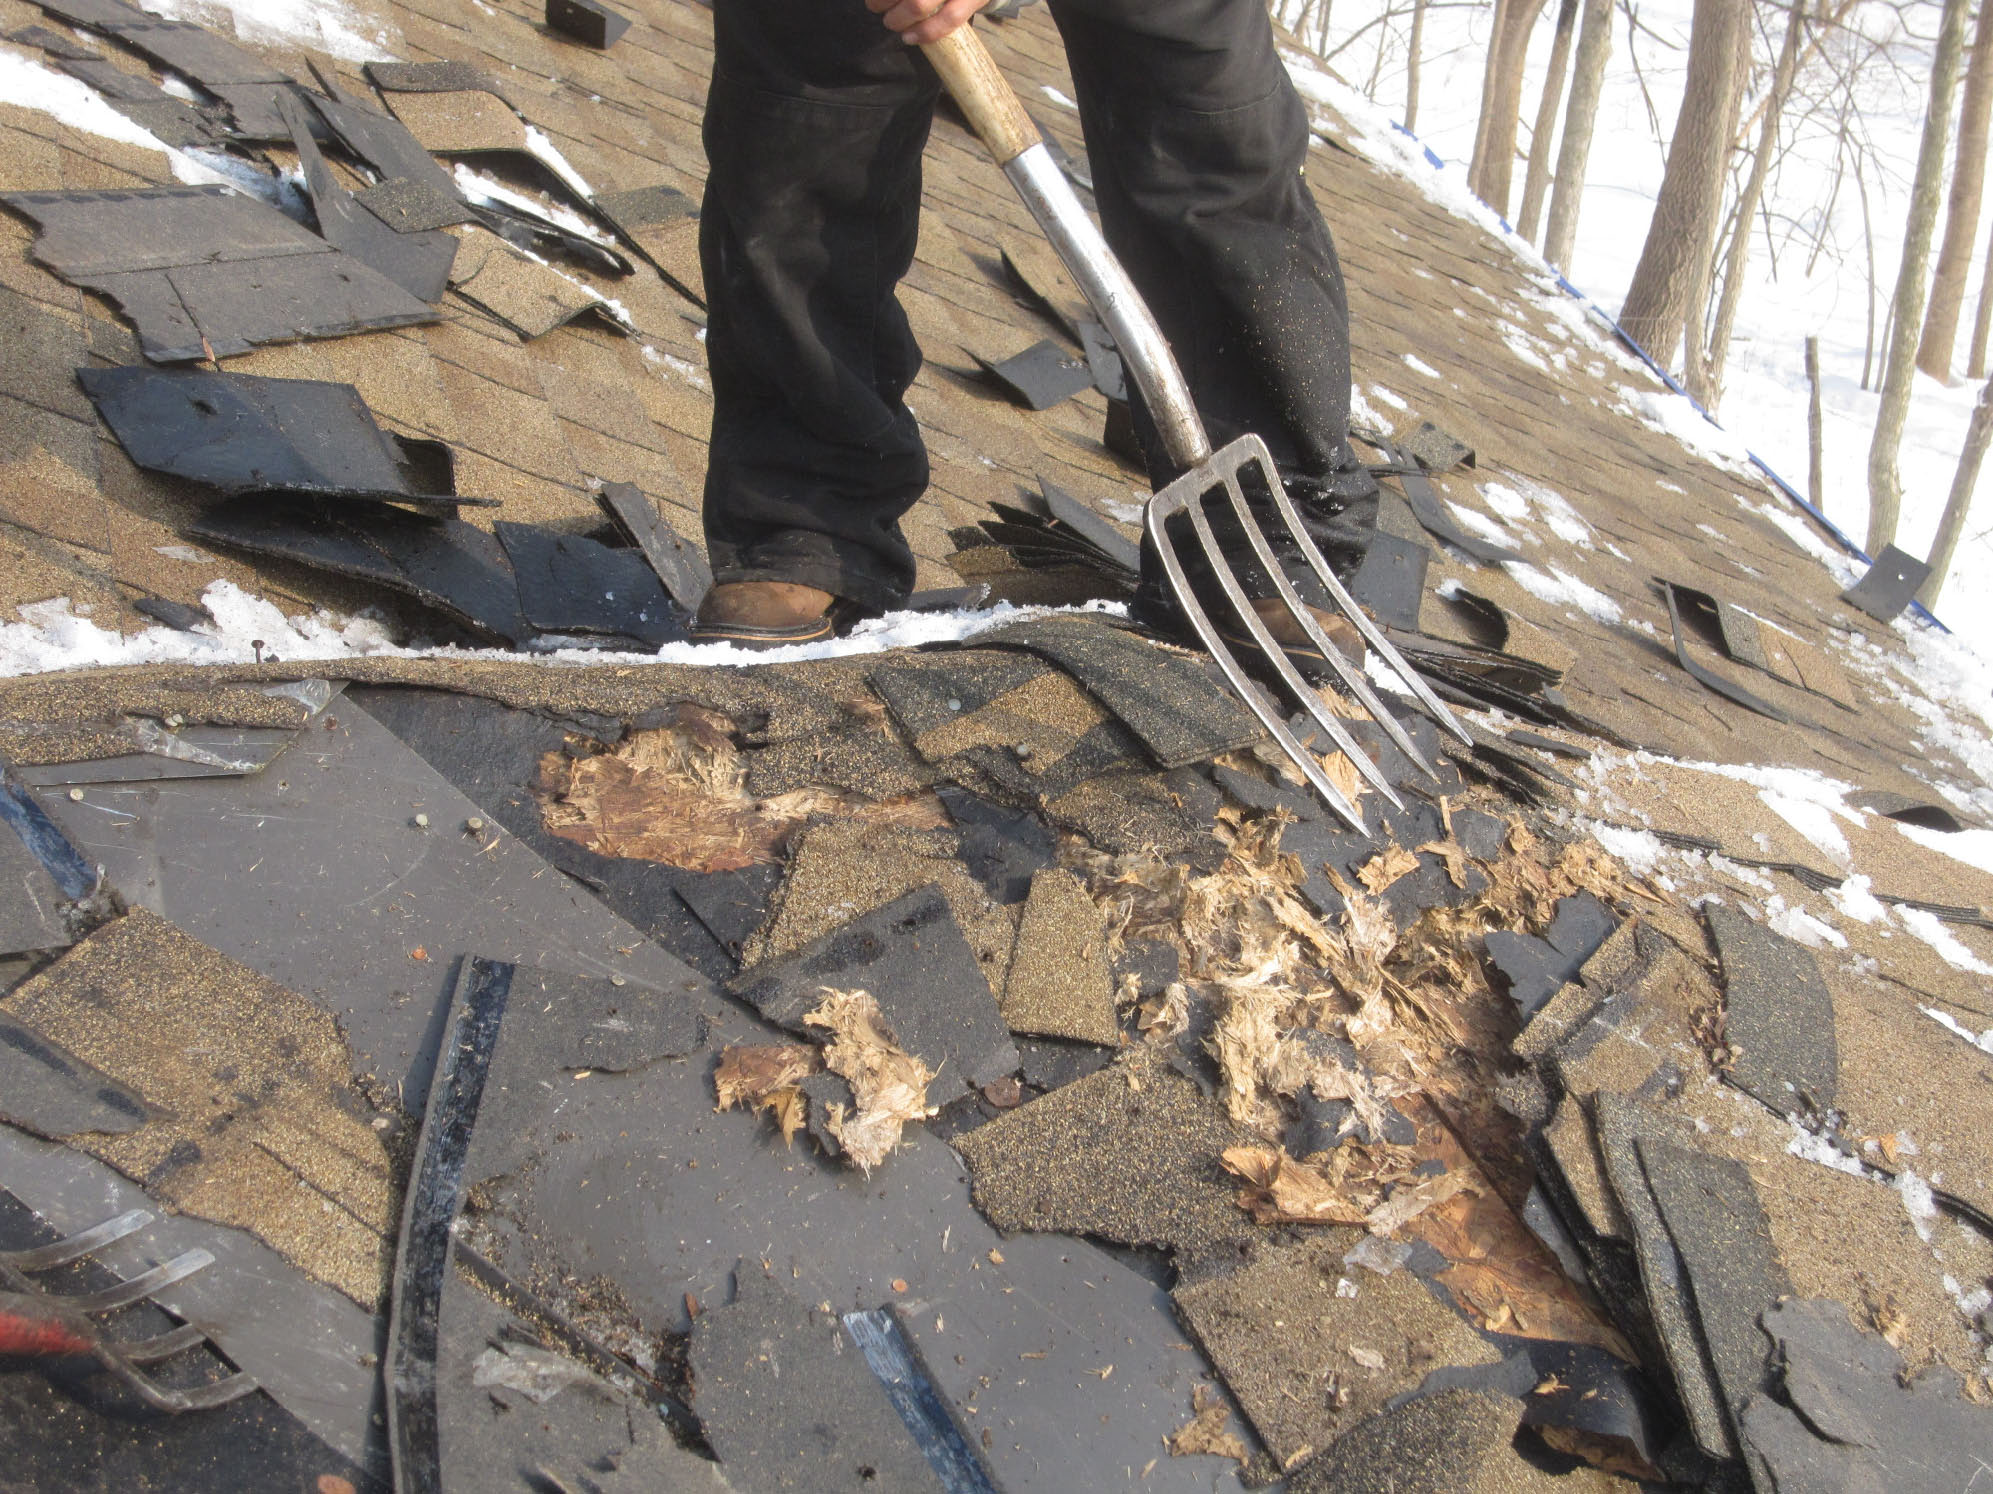
Ideally, the scratch coat must cover the lath. As mentioned, this doesn’t always happen in the field, but it is important that this happen at the edges, otherwise the lath will rust. When we first inspected this house, most of the edges where uncovered and showing a lot of corrosion (see image 1).
Solid, dry structure. Stucco can’t tolerate a lot of movement and is prone to cracking. To minimize cracking, walls must be rigid. Sound framing, with particular attention paid to wind bracing, applies. In addition, it’s important to protect the structure from water during construction to avoid trapping moisture or soaking OSB sheathing, which can lead to swollen panel joints.
Roof-Wall Intersections
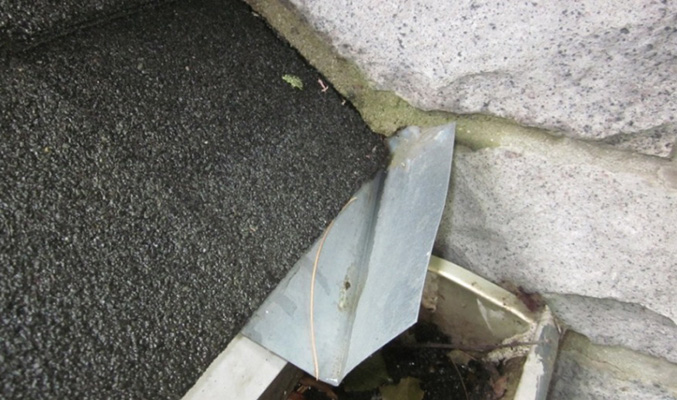
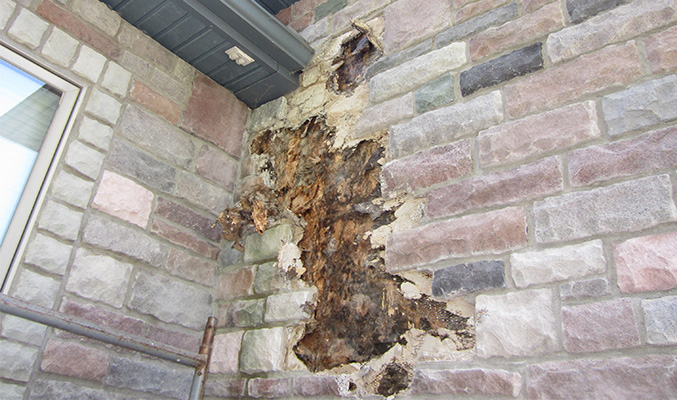
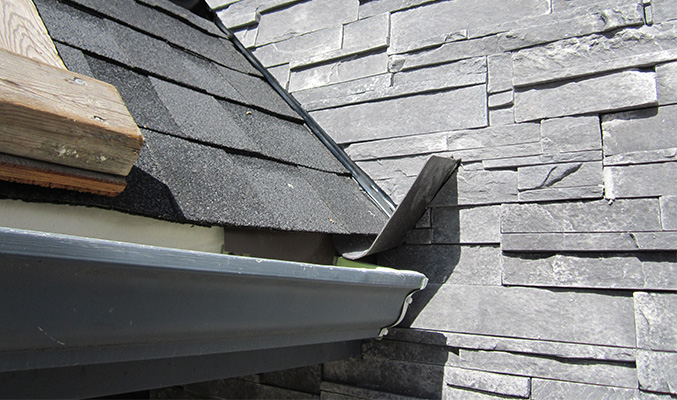
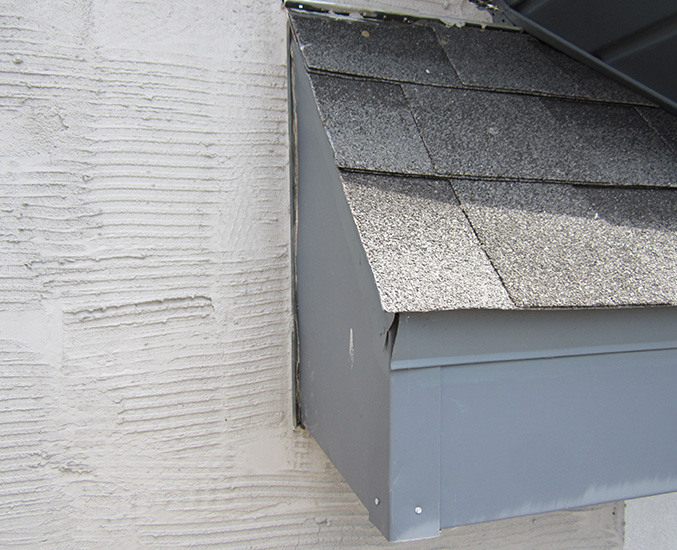
The intersection where a roof meets a wall turns out to be one of the most important details on the entire exterior. On this particular house, we found some attempt to install kick-out flashing above the gutters on roofs intersecting sidewalls. The kick-out shown above (see image 1) had probably been installed after-the-fact, and it was much too little, much too late. You can see clearly the tragic result of having such a wimpy kick-out flashing (see image 2).
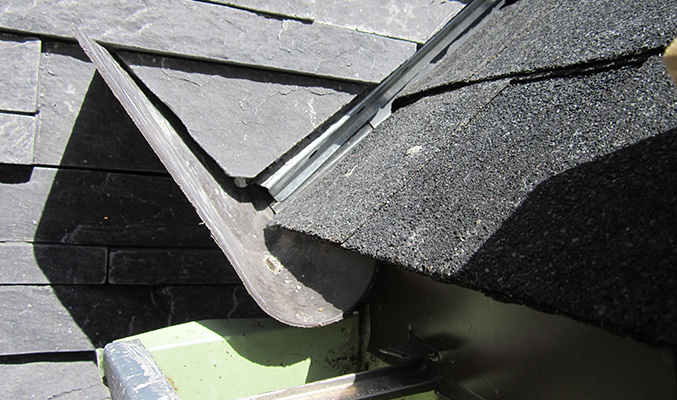
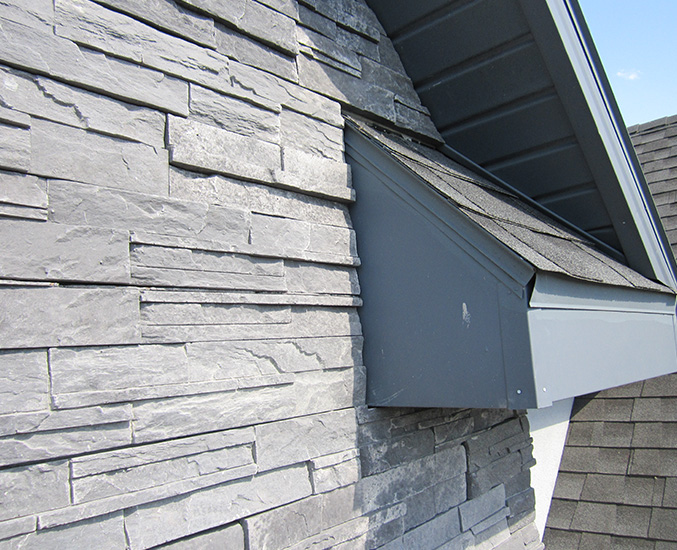
To do it right, we used a pre-formed kick-out flashing by DryFlekt (dryflekt.com) at the base of the run (see image 3). A steep roof, like the one shown in the photo, will require a sizable area to prevent spillover that would load the wall with water. The illustrations at right show in detail how this kick-out needs to be integrated with step flashing woven into the roof shingles.
Over the step flashing, we completed our assembly, installing a weep screed along the slope of the roof. (Technically, you should hold the weep screed 2 inches above the shingles. But this detail looks strange, so we bring it right down to the roofline and have never had problems.) The weep screed was followed by housewrap, black paper, rainscreen mat, and lath, all terminating to a weep screed at the roofline before applying the scratch coat (see image 4).
Note the small cricket at the end of the valley above the kick-out (see image 5). This is a variant of the kick-out and it performs the same critical task of diverting water away from the walls.
{Diagram screenshot}
We have to constantly remind ourselves that ACMV absorbs and holds a lot of water, so we need to do everything possible to avoid loading the stone with water. Wide overhangs and meticulous detailing on gutters and valleys are critically important.
Windows and Doors
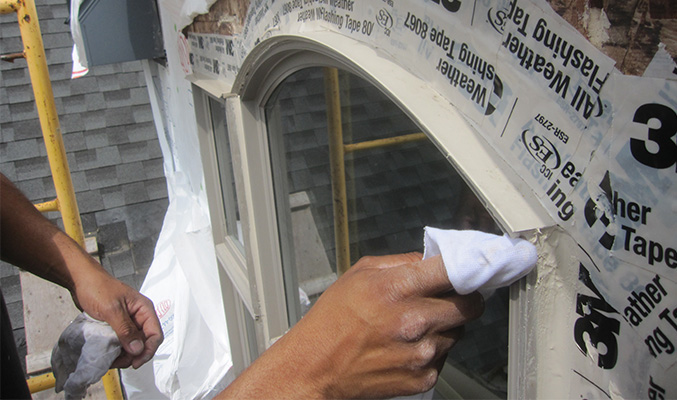
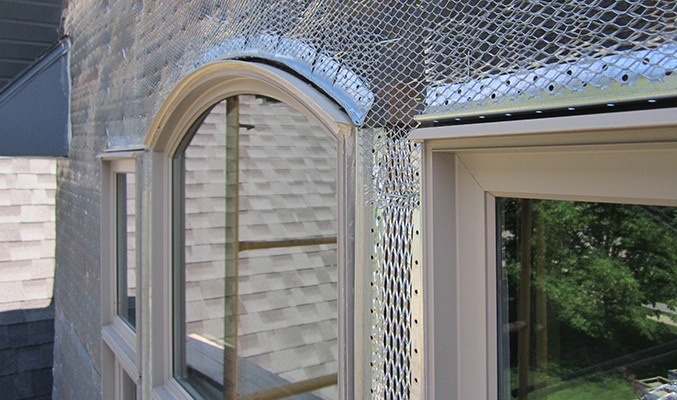
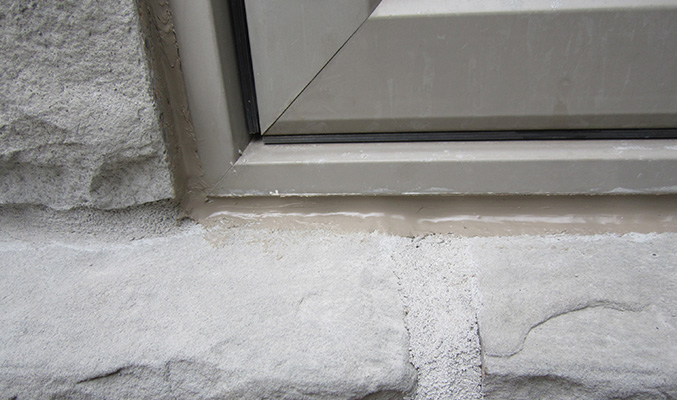
Around windows and doors, care needs to be taken to integrate flashing tape and housewrap. On the sides and bottom, the flashing should lap over the housewrap; but at the head, the housewrap should lap over the flashing (see image 1). If we had installed the windows to begin with, we would have installed a drainable sill pan that lapped over the top of the housewrap below the window. But on a remediation job, we have to work with the existing window installation. In this case, I am not too concerned that the sill is taped off, because the weep holes in the window frame drain to the outside of the tape where the rainscreen mat will be. I’d rather make sure that the water streaming off the glass and flowing over the sill doesn’t seep into the wall along the top of the housewrap below the window. At the head we install a weep screed, followed by metal lath (see image 2). Again, it’s critical that water be allowed to drain, otherwise it can collect, eventually seeping inside. Along window jambs and sills we install metal casing bead, spaced about 3/8-inch from the window flange (see image 3).
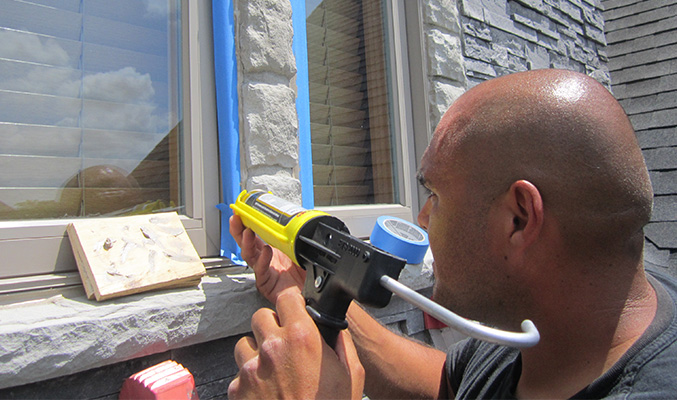
After the stone gets installed, the gaps formed by the casing bead (see image 4) will be filled with backer rod and (after taping off the windows with blue painter’s tape) finished with a bead of sealant (see image 5). When we peel off the blue tape, we get a joint with crisp edges (see image 6). Though I like this detail, I’m not too concerned about these joints around the opening because the whole assembly behind it is drainable. This also applies to the gaps in the scratch coat (see image 3), which I’d rather not have. But I do like having the flexible joint nobetween the window frame and the stone to accommodate the thermal expansion of dissimilar materials. What usually happens is that the masons will simply fill the gap between the window and the stone with mortar, and the mortar cracks almost immediately. If nothing else, this looks bad. But usually the wall is not drainable, so the crack also allows for the speedy flow of water into the wall.
Inside Corners

Nothing special has to happen where stone wraps around an inside wall corner. It is the same materials on each face of the wall, and there’s no reason for them to move at dissimilar rates. But on the inside corner shown above (see image 1), one wall will get stone and the other has EIFS.
In this case we wanted a flexible joint to accommodate the potential for these two walls to move at different rates. We did this using the same detail we applied at the sides of window and door openings: installing a metal J-bead spaced about 3/8-inch from the corner. The gap then gets filled with backer rod and sealant before the stone is applied.
On another section of the house, where a wimpy kick-out spilled over the wall, we had to replace the entire cladding assembly. Since the new stone we had did not replace the old stone, we created a detail that was consistent with some of the EIFS detailing on this house, using HardiePanel with a stucco finish (an affordable alternative to EIFS) installed over housewrap and rainscreen battens. This created an inside corner where the old stone met new HardiePanel. Ordinarily we would wrap the inside corner with housewrap (being careful to avoid having a joint), but in this repair we took extra care to ensure that no water got behind the housewrap by flashing the corner with tape and using a healthy portion of sealant, tooled over the tape, to create as good a barrier seal as we possibly could (see image 2).
Top of Wall
 At the top of walls, we can bring the rainscreen mat right to the J-bead supporting the soffit (see image). Some experts would argue that the top edge should be finished off with a metal J-bead held away from the soffit and the gap sealed with backer rod and caulk. But I don’t think this joint will ever see much water, even along the rake. If anything, the top of the rainscreen should be allowed to vent, which it will through the inevitable gaps in the scratch coat and around the vinyl soffit bead, which is never installed too tight.
Rake returns
A rake return, like the ones on the gable ends of this house, is a different animal. Here we have a vertical joint that will see its fair share of wind and rain (see image 1). We use the standard detail for any vertical joint, and just like the one used around windows and doors: We install a J-bead with a gap that we finish off with backer rod and sealant be- fore the stone is applied. Along the small section of roof above a rake return (see image 2), we need a weep screed above the shingles.
By now you are probably getting a good idea of what works with ACMV: The assembly needs to be drainable using a rainscreen material over a well-detailed weather barrier. We believe in a two-layer weather resistive barrier to slow any vapor drive to the interior when you have a cladding material that stores a lot of water. All horizontal transitions need a weep screed to allow water to exit the assembly, and all vertical transitions between dissimilar materials need metal J-bead with a small gap so you can create a flexible joint by installing backer rod and sealant. If you follow these rules, you will have a fighting chance of avoiding expensive repairs.


Why I am NOT a Home Inspector
Call Before It's an Emergency
© Copyright 2026, The Building Consultant/Mark Parlee
Des Moines Web Design  by Flying Hippo